Saturday, July 28, 2012
Sunday, July 22, 2012
Saturday, July 14, 2012
Monday, July 9, 2012
Blender Cycles Test
If you can figure out how to do it, Blender's Cycles produces some unbelievable results.


Science Demo
Paige needed a visual of the layers that make up the earth, made up of transparencies. Something that could be turned into an interactive hands on demo consisting of a set of cutouts or transparencies. Here is what I came up with for her.
Atmosphere and Hydrosphere

Crust

Mantle

Lithosphere

Asthenosphere

Outer Core

Inner Core

The Full Image

Caustics Test

Renderers need special instructions to create the fancy light patterns you see behind the and around the bottles. This image contains 2 kinds of caustics. First are the Reflected Caustics, those are the ones you see in front of the bottles. They are bounced off the object. The second type are Refracted Caustics. Those are the ones behind. They are created when light passes through a transparent object. the sharp edges int the pattern are possible because of the "sharp" edges in the model.
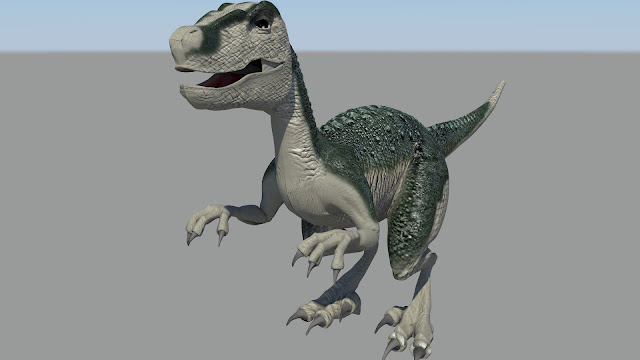
Hand Painting Textures
This was an exercise in hand painting textures, then creating Normal and Displace textures from the color map.
The color map was created using some elephant and crocodile skin images. The model was pulled into Photoshop and painting directly onto the color layer. Additional fine tuning was done on the flat color layer image.
The gray areas are from the Elephant Skin, and the green are from the Crocodile skin.

The Diffuse, Displace and Normal layers were created using a trial version of CrazyBump, then pulling those images into Photoshop and cleaning up the problem areas or removing the texture from the spots where they were not wanted. This took a while as crazy pump treated all the boundaries between color sections as if they were changes in height. The color layer had to be run through CrazyBump as a grayscale image, then much work had to be done to "equalize" the sections into a topographical map of sorts. color map
 Diffuse Layer - this tells the render engine where to increase or decrease shadows. Think of it as adding dirt.
 Displacement Layer - This tells the renderer to physically distort the model. This adds large bumps to the model. It is easier to add features this way rather than modeling them, but they also render faster this way as well.
 Normals Layer - This layer warps the shadow. It tells the renderer to bend the light, giving the illusion of creases and fine detail. This does not physically distort the mesh, but is also a great way to add fine detail without making the image render slower.
Here is the finished project without the displacement map:

And here it is with the displacement:
The color map was created using some elephant and crocodile skin images. The model was pulled into Photoshop and painting directly onto the color layer. Additional fine tuning was done on the flat color layer image.
The gray areas are from the Elephant Skin, and the green are from the Crocodile skin.
The Diffuse, Displace and Normal layers were created using a trial version of CrazyBump, then pulling those images into Photoshop and cleaning up the problem areas or removing the texture from the spots where they were not wanted. This took a while as crazy pump treated all the boundaries between color sections as if they were changes in height. The color layer had to be run through CrazyBump as a grayscale image, then much work had to be done to "equalize" the sections into a topographical map of sorts. color map
Here is the finished project without the displacement map:

And here it is with the displacement:

Sunday, July 1, 2012
Subscribe to:
Comments (Atom)