Showing posts with label Surfacing. Show all posts
Showing posts with label Surfacing. Show all posts
Sunday, October 14, 2012

Sunday, September 23, 2012
Saturday, September 1, 2012
Saturday, August 25, 2012
Saturday, August 18, 2012
Saturday, August 11, 2012
Saturday, August 4, 2012
Sunday, July 22, 2012
Saturday, July 14, 2012
Monday, July 9, 2012
Hand Painting Textures
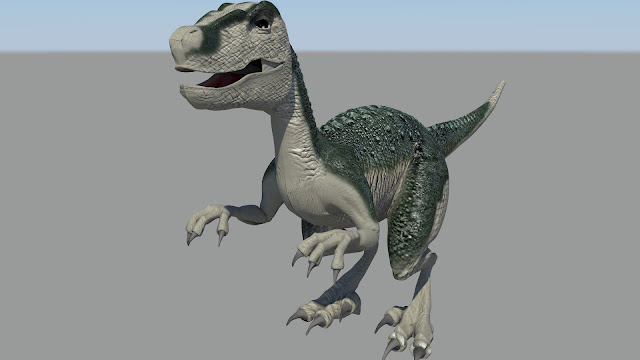
This was an exercise in hand painting textures, then creating Normal and Displace textures from the color map.
The color map was created using some elephant and crocodile skin images. The model was pulled into Photoshop and painting directly onto the color layer. Additional fine tuning was done on the flat color layer image.
The gray areas are from the Elephant Skin, and the green are from the Crocodile skin.

The Diffuse, Displace and Normal layers were created using a trial version of CrazyBump, then pulling those images into Photoshop and cleaning up the problem areas or removing the texture from the spots where they were not wanted. This took a while as crazy pump treated all the boundaries between color sections as if they were changes in height. The color layer had to be run through CrazyBump as a grayscale image, then much work had to be done to "equalize" the sections into a topographical map of sorts. color map
 Diffuse Layer - this tells the render engine where to increase or decrease shadows. Think of it as adding dirt.
 Displacement Layer - This tells the renderer to physically distort the model. This adds large bumps to the model. It is easier to add features this way rather than modeling them, but they also render faster this way as well.
 Normals Layer - This layer warps the shadow. It tells the renderer to bend the light, giving the illusion of creases and fine detail. This does not physically distort the mesh, but is also a great way to add fine detail without making the image render slower.
Here is the finished project without the displacement map:

And here it is with the displacement:
The color map was created using some elephant and crocodile skin images. The model was pulled into Photoshop and painting directly onto the color layer. Additional fine tuning was done on the flat color layer image.
The gray areas are from the Elephant Skin, and the green are from the Crocodile skin.
The Diffuse, Displace and Normal layers were created using a trial version of CrazyBump, then pulling those images into Photoshop and cleaning up the problem areas or removing the texture from the spots where they were not wanted. This took a while as crazy pump treated all the boundaries between color sections as if they were changes in height. The color layer had to be run through CrazyBump as a grayscale image, then much work had to be done to "equalize" the sections into a topographical map of sorts. color map
Here is the finished project without the displacement map:

And here it is with the displacement:

Sunday, July 1, 2012
Saturday, June 23, 2012
Saturday, June 16, 2012
Saturday, June 9, 2012
Saturday, June 2, 2012
Saturday, May 26, 2012
Monday, May 21, 2012
Atlanta Georgia Temple
Sunday, May 13, 2012
Friday, April 13, 2012
Sapporo Japan Temple
Wednesday, March 7, 2012
Ogden Temple Remodel, Revised
 |
| The Revised render for The Ogden Utah Temple |
 |
| The Original Render |
The LDS Church recently revised the render for the Ogden Temple. I updated my model as well. Still off on a couple of Details, am I, but I like the way it looks.
Subscribe to:
Posts (Atom)